wip – chicken quilt

Today I have a few photos from my wip –  a Chicken Quilt Throw inspired by Emily from Quilty Love. The free chicken block pattern and tutorial is by Vicki from Sew Inspired. Thanks ladies for inspiration and sharing!

wip - chicken quilt throw 3 - skalabara quilts

The block is easy and quick to piece, but nevertheless it makes a nice decoration quilt for the sofa.

wip - chicken quilt throw - skalabara quilts

The chicken block in detail :

wip - chicken quilt throw 2 - skalabara quilts

The chickens are waiting for sashing and quilting :

wip - chicken quilt throw 1 - skalabara quilts


Thanks for stopping, have a nice weekend and enjoy sewing!

barbora   flower small skalabara quilts


trip around the world quilt

I have always wanted to make a Trip Around the World quilt. This summer was the right time start with this project. As I am aiming to use my stash that I have bought over the years, I got out my fabrics and started cutting strips of 2,5″ x 16″. My idea was to make 24 blocks, each block is 12″ x 12″ finished size and has 36 squares.

trip around the world quilt - skalabara quilts

A tutorial for Trip Around the World quilt can be found here and here and here – with fabric requirements and colouring page download sheet. Here some quilt inspirations. I have decided to combine the design with an Irish Chain quilt pattern and I have chosen a yellow solid fabric for the diagonal squares of each block.

trip around the world detail 2 - skalabara quilts

I have used for the first time Aurifil Mako 40/2 quilting thread in Light Sand. Really good quality thread, definitely will be my choice for the future. I have quilted this quilt using the walking foot in straight lines on the diagonal.

trip around the world detail 1 - skalabara quilts

The backing of this Trip Around the World quilt is pieced with three different fabrics : a pattern one that I have bought as backing fabric and two Kona solids from my stash.

trip around the world quilt back - skalabara quilts

This time the choice of binding fabric was easy : I have used all the cut offs from the quilt backing that I have cut in approx 22″ long strips and pieced together interchanging the fabrics.

trip around the world quilt binding - skalabara quilts

One more photo of the folded quilt :

trip around the world folded quilt - skalabara quilts

Quilt details :

quilt size : 48″ x 72″

block size : 12″ x 12″ finished, layout of 4 x 6 blocks = 24 blocks = 864 squares

quilting thread : Aurifil Mako 40/2 colour 2000 Light Sand

wadding : Warm & White by Warm Company / 87,5% cotton – 12,5% polypropylene


Thanks for visiting, happy quilting, barbora  flower small skalabara quilts

looking back the years and starting something new (2x)

Looking back the years :

A friend of mine gave me  a couple of weeks ago some quilting books. I’ve looked through them and thought how much has changed in patchwork and quilting over the last 40 years .

My favourite one is “The Perfect Patchwork Primer” by Beth Gutcheon. It was first published in 1973. The issue is in black and white, includes a few photos and many block illustrations, designs or quilt assembly instructions. The author is a devotee of hand quilting. Machine piecing is OK, but machine or free-motion quilting is unthinkable. The other thing that surprised me, is that in those days there were no cutting mats, cutters or rulers. Only “home-made” templates were available and for cutting there were just scissors. Today we are very spoilt with all our sophisticated tools and various helpers.

Starting something new :

# One : From next week on I shall give classes in machine piecing and quilting. So last week I sew an easy sampler quilt top for beginners. At the same time I made tutorials about basic cutting and piecing of square and triangle units, blocks with flying geese units as well as sashing and borders, quilting and binding. I enjoyed preparing all information and I am looking forward to start with the classes!!!

# Two : While working on the computer I got an idea for a new quilt. A simple design with all the solids I love. It is based on the ideal proportion of the sides of a rectangle : golden ratio. As the top has also a “golden” solid fabric I named it Golden Ratio . Changed my mind, the name is Floating Colors  This one shall be quilted in straight lines in vertical and horizontal. The goal for next week (but more probably weekend) is to finish the quilt.

Happy quilting, B.

My Very First PDF Tutorial is Here –

Lost in Space Pillow

It has been some time since my last post. I did not have time to work on my quilt as I have started designing some tutorials in pdf.

I was playing with the design, how to place photos and text on a sheet. My very first pdf tutorial is now finished and I am working on the next one – a log cabin tutorial of my Abstract Dreaming Quilt. My next goal is to finish the quilt, take photos for the tutorial, revise and publish it. This is easier said as done or quicker said as done.

Please have a look on the tutorial and leave a comment if you like it (or not).

HST – Half Square Triangle Quilt Tutorial

HST – Half Square Triangle Quilt – the one I always wanted to make and never started. This easy pattern is ideal for practicing precise cutting, piecing and pressing. Since I was working with the wonderful batiks on my last project and liked them very much,  I decided to carry on with the same fabrics. They are so colourful and warm.

Quilt size : 42″ x 48 “

Distribution : 16 rows with each 14 HST blocks, all together 224 HST blocks.  I have decided to work with 4″ strips. After piecing and trimming the blocks have a size of 3,5″ x 3,5″.

Material :

Solid fabric : 1 1/2 yard from colour of your choice; cut in 4″ strips and then in 4″ x 4″ squares

Colour fabrics : all together 1 1/2 yard or 13 different colours; cut in 4″ strips and then in 4″ x 4″ squares

Backing fabric : 1 1/2 yard

Batting : 43″ x 50 ”

Binding : 3/8 yard, cut 5 strips each 2,5″

Assembly :

1. Prepare all pieces by cutting into squares

2. Draw a diagonal line on the left side of the solid fabric, pin together with a batik one

3. Sew all squares along the drawn line with a 1/4″ seam allowance (normally width of the presser foot) using the chain piece method.

4. Complete the piecing by sewing along the other side of the line.

5. Now cut the squares diagonal along the drawn line in

6. Press seams open

7. Trim the squares to 3,5″ x 3,5″

8. You are ready to work on the layout. Using a design wall you can distribute the colour squares according your imagination – see below

I have decided to subdivide the quilt into several sewing batches. Taking always 4 rows with 7 squares. First I sew each row together, then the rows and as last the batches.

Here the rows are pressed a ready for pinning :

Accurate pinning is the secret to a nice and tidy quilt top. So take time, don’t hurry and work on your skills :

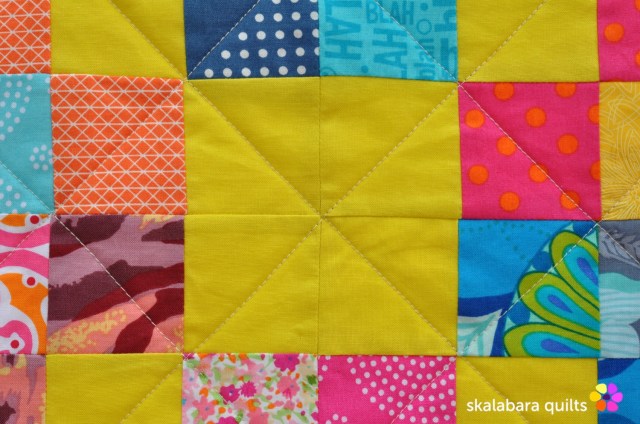
Once more : I pressed all seams open

And this is the finished top :

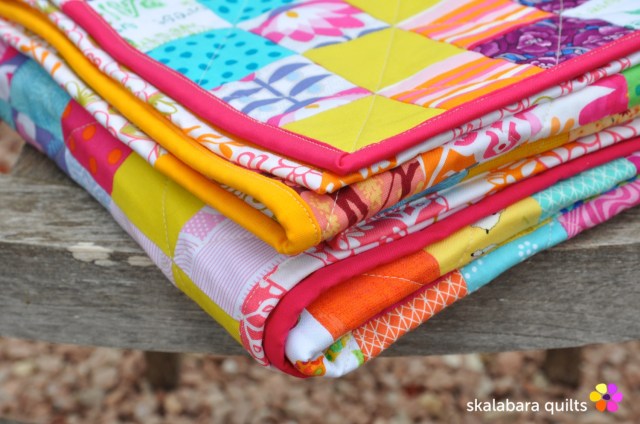
Prepare a sandwich and quilt as you want. After a lot of straight line quilting I decided to go for free-motion quilting. Trim the quilt and add binding. My favorite machine binding tutorial.

The quilt is listed on Etsy and Dawanda S O L D ! !